ChatGPT Photo Editing Prompts: 60+ Copy-Paste Prompts (2026)
60+ ChatGPT photo editing prompts you can copy and paste — portraits, product shots, Instagram trends, background removal and restoration — plus a step-by-step process for editing any photo with AI.
- 01What ChatGPT can and cannot do with photos
- 02The six-part prompt formula
- 03Step-by-step: editing any photo with ChatGPT
- 04Build your own prompt
- 0565 ChatGPT photo editing prompts
- 06Worked example: phone photo to ecommerce packshot
- 07Follow-up prompts that fix a bad output
- 08Seven mistakes that ruin AI photo edits
- 09ChatGPT vs other photo editing tools
- 10How performance marketers use photo editing prompts
- 11Test yourself
- 12Your prompting checklist
- 13Where to go next
We'll email you our Performance Marketing Setup Checklist instantly.
No spam. Unsubscribe anytime.
Most people type "make this photo better" into ChatGPT, get something odd back, and conclude AI photo editing does not work. The prompt is the problem, not the model.
A photo editing prompt is a brief. The more precisely you write it, the more repeatable the output — and repeatability is what matters if you are producing ad creative, product images or headshots at any volume. This guide gives you the structure, 65 copy-paste prompts, a builder you can use right now, and an honest list of what AI still gets wrong.
What ChatGPT can and cannot do with photos
It is genuinely good at:
- Removing and replacing backgrounds, including tricky edges like hair
- Relighting a scene and correcting colour casts
- Removing objects, wires, bins and background people
- Restyling an image — film look, illustration, cinematic grade
- Restoring old, scratched or faded photographs
- Extending an image to a different aspect ratio
It is still unreliable at:
- Reproducing a person's face exactly, especially in profile or at small sizes
- Small legible text, logos and product labels
- Fine mechanical or jewellery detail
- Counting things — fingers, buttons, items on a shelf
- Genuine resolution: upscaling invents detail rather than recovering it
For anything commercial, treat the AI output as a draft you inspect at 100% zoom. Faces, hands, labels and edges are where the failures hide.
The six-part prompt formula
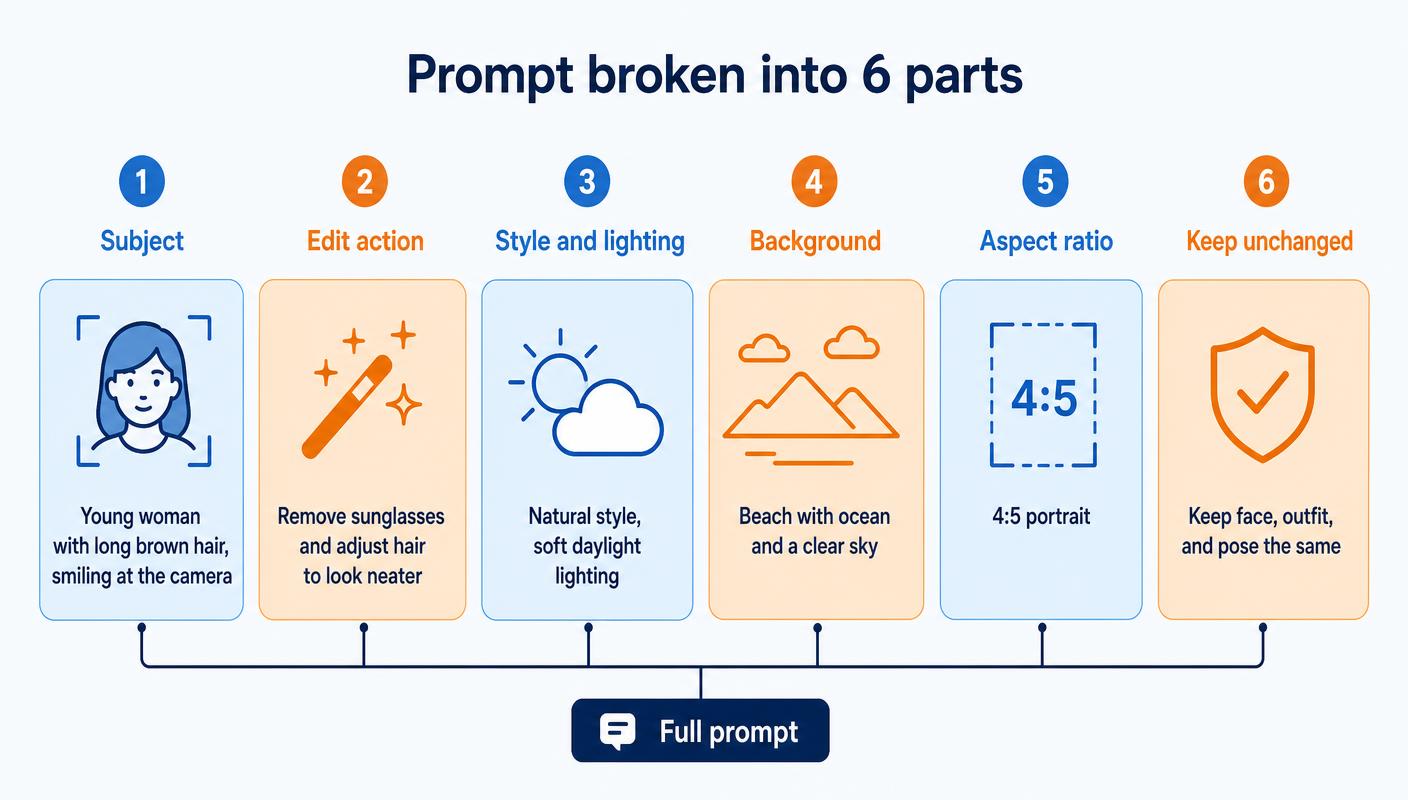
Every prompt in this article follows the same structure:
[Subject] + [Edit action] + [Style and lighting] + [Background] + [Aspect ratio] + [Keep unchanged]
Here is the difference it makes.
Weak prompt: "Make this a professional photo."
Strong prompt: "Edit the attached photo of a man in a black t-shirt into a professional corporate headshot. Replace the background with a neutral grey studio backdrop, add soft key lighting from the left, keep his face, hairline and expression exactly as they are. Output 4:5 portrait, photorealistic, no added text."
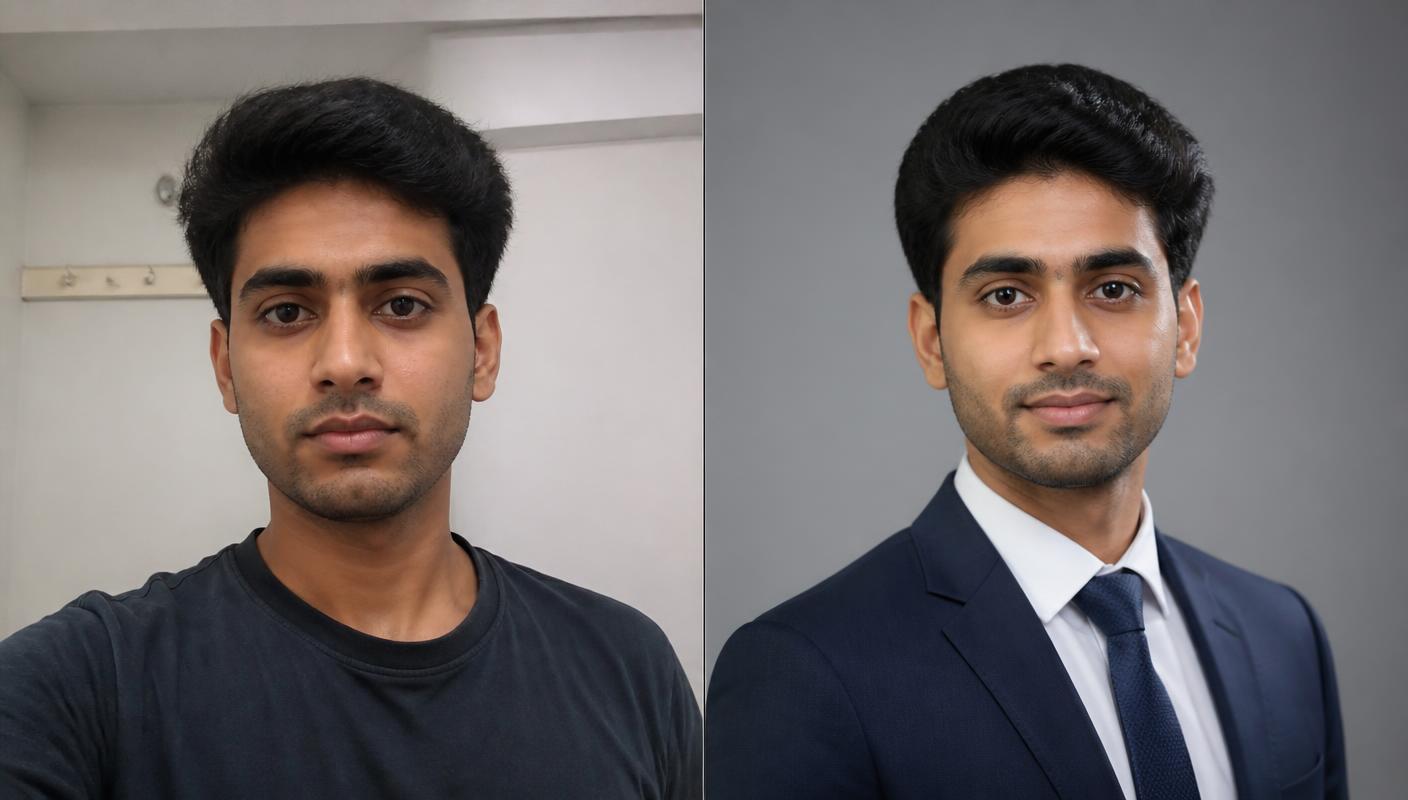
The last clause does most of the heavy lifting. Without "keep the face exactly as it is", the model treats the face as fair game and quietly redraws it — the failure people call likeness drift.
Step-by-step: editing any photo with ChatGPT
- Upload the original. Full resolution, not a screenshot or a WhatsApp forward. The model cannot restore detail that compression already threw away.
- Describe the subject in one line. This anchors the edit to the right thing in the frame.
- Ask for one change. Background or lighting or outfit. Stacking edits is the single biggest cause of bad output.
- Name the style and lighting. Otherwise the model chooses for you, and it will choose differently every time.
- State the aspect ratio. 1:1 feed, 4:5 portrait, 9:16 Stories, 16:9 banner and YouTube.
- Add the keep-unchanged clause. Face, logo, label, colour — whatever must survive the edit.
- Iterate in the same chat. "Same image, only make the shadow softer" beats rewriting the prompt from scratch.
- Check, then export. Zoom into faces, hands, text and edges before anything gets published.
Build your own prompt
Pick the six parts of the formula and copy the finished prompt.
Edit the attached photo of a portrait of a person. Turn it into a professional headshot. Lighting and style: studio lighting with a soft shadow. Background: neutral grey studio backdrop. Output as a 4:5 portrait image at the highest detail you can produce. Keep the face, hair and outfit exactly as they are unchanged, and make no other changes. Photorealistic, no added text or watermarks.
65 ChatGPT photo editing prompts
Swap anything in square brackets for your own details. Everything else can be pasted as-is.
Tap a category to filter. Every prompt has a copy button — paste it into ChatGPT with your photo attached, then swap the bracketed parts for your own details.
Portraits & headshots
Turning phone selfies into images you can put on LinkedIn, a resume or a website team page.
Edit the attached photo into a professional corporate headshot. Replace the background with a neutral grey studio backdrop, add soft key lighting from the left with a gentle fill on the right, and keep the person's face, hairline and expression exactly as they are. Output 4:5 portrait, photorealistic, no added text.
Use this when: You need a LinkedIn or resume photo and only have a casual snapshot.
Edit the attached portrait: change the t-shirt to a well-fitted navy blazer over a white shirt. Keep the face, hair, skin tone and pose exactly unchanged. Natural daylight, clean grey background, 4:5 portrait.
Use this when: The photo is right but the clothing is too casual for the context.
Retouch the attached portrait lightly: even out skin tone, reduce shine on the forehead and soften harsh shadows under the eyes. Keep skin texture, pores, freckles and all facial features visible and unchanged — no smoothing that looks plastic. Same framing, same background.
Use this when: You want the photo to look polished, not filtered.
The attached photo was taken under yellow indoor tube light. Correct the white balance to neutral daylight, brighten the face evenly, recover detail in the shadows and keep the background as it is. Do not change the person's features or the composition.
Use this when: The subject looks orange or muddy because of room lighting.
Edit the attached photo into a confident speaker profile image: subject sharp in the foreground, background softly blurred to suggest a conference hall, warm natural lighting. Keep the face and outfit identical. 1:1 square output with the subject slightly right of centre.
Use this when: You need an about-page or event-page photo with a professional context.
In the attached group photo, remove the strangers walking in the background, straighten the horizon and brighten the faces of everyone in the group evenly. Keep every person in the group, their faces and their positions exactly the same. 16:9 landscape.
Use this when: A batch photo or team photo has distractions behind the group.
Convert the attached photo into a passport-style portrait: plain white background, even frontal lighting with no shadow behind the head, shoulders visible, head centred and facing the camera. Keep the face, glasses and hair exactly as they are. Square output.
Use this when: You need a plain, document-style photo from a normal picture.
Convert the attached portrait into a high-contrast black-and-white editorial image with a single soft light from the side and deep but detailed shadows. Keep the face, expression and framing unchanged. 4:5 portrait.
Use this when: You want a striking author or founder photo.
Trending Instagram styles
The viral looks people search for — treat these as starting points and change the details to fit your photo.
Restyle the attached photo as a 1990s film photograph: slightly warm colour cast, visible film grain, soft focus falloff at the edges and a modest light leak in one corner. Keep the person's face, outfit and pose exactly the same. 4:5 portrait.
Use this when: You want the nostalgic film aesthetic without a filter app.
Place the attached photo inside a classic instant-camera print: white border with a thicker bottom margin, slightly faded colours and a soft flash look on the subject. Keep the subject unchanged and leave the bottom margin empty. Square output.
Use this when: Making a keepsake-style post or a story sticker.
Relight the attached portrait as if shot at golden hour: warm low sunlight from behind the subject creating a soft rim light on the hair, gentle lens flare, background softly blurred greenery. Keep the face, outfit and pose unchanged. 4:5 portrait.
Use this when: The original was shot indoors and looks flat.
Edit the attached portrait into a festive Indian celebration setting: warm decorative lighting with bokeh diyas in the blurred background, rich warm colour grade. Keep the person's face, clothing and jewellery exactly as they are. 4:5 portrait.
Use this when: Festival posts where you only have an indoor photo.
Turn the person in the attached photo into a stylised 3D collectible figurine standing on a round base inside a clear display box, soft studio lighting, plain background. Keep the hairstyle, outfit colours and recognisable features. Square output, no text on the box.
Use this when: The viral figurine trend — good for fun brand posts.
Turn the subject in the attached photo into a die-cut sticker: bold white outline around the subject, simplified colours, flat shading, transparent-looking plain background. Keep the pose and expression recognisable. Square output.
Use this when: Making WhatsApp or Telegram stickers from a photo.
Restyle the attached photo as a miniature tilt-shift scene: sharp focus on a narrow horizontal band through the centre, strong blur above and below, boosted saturation and contrast so the scene looks like a scale model. Keep the composition unchanged. 16:9 landscape.
Use this when: Cityscape, event or crowd photos.
Restyle the attached full-length photo as a fashion editorial shot: seamless coloured paper backdrop, hard directional studio light with a crisp shadow on the floor, high contrast colour grade. Keep the person's face, body proportions and outfit unchanged. 4:5 portrait.
Use this when: Personal-brand content that needs to look shot in a studio.
Backgrounds — remove, replace, blur
The single most reliable category of AI photo edit. These prompts work on almost any image.
Remove the background from the attached photo and place the subject on a pure white background with a soft natural contact shadow beneath it. Keep the subject's edges clean, including hair and thin details. Do not alter the subject itself. Square output.
Use this when: Ecommerce listings, catalogues, presentation slides.
Replace the background of the attached photo with a bright modern office interior, softly out of focus. Match the lighting direction and colour temperature on the subject to the new background so the composite looks real. Keep the subject unchanged. 16:9 landscape.
Use this when: Team pages and professional profiles.
Keep the attached photo exactly as it is but apply a realistic shallow depth-of-field blur to the background only, with a natural falloff. Keep the subject and its edges perfectly sharp, including hair. Do not change colours or composition.
Use this when: A cluttered room behind an otherwise good photo.
Replace the background of the attached photo with a smooth studio gradient going from mid-grey at the top to lighter grey at the bottom. Add a subtle shadow behind the subject. Keep the subject's lighting, colours and edges unchanged. 4:5 portrait.
Use this when: A consistent look across many different source photos.
Place the subject from the attached photo into a sunlit outdoor café setting, background softly blurred, warm afternoon light. Match the light direction on the subject to the scene and add a realistic ground shadow. Keep the subject's face and outfit unchanged. 4:5 portrait.
Use this when: Lifestyle ad creative from a plain studio shot.
Remove all background people and passers-by from the attached photo and rebuild the background naturally where they were. Keep the main subject, the architecture and the lighting exactly as they are. Same framing.
Use this when: Travel and event photos with crowds.
Replace the background of the attached photo with a flat solid background in hex colour #1E3A8A. Add a soft drop shadow behind the subject so it does not look pasted on. Keep the subject's colours and edges unchanged. Square output.
Use this when: Social posts that must sit inside brand guidelines.
Product & ecommerce photos
Turning phone photos of a product into images you can list or advertise with.
Turn the attached product photo into a clean ecommerce packshot: pure white background, even soft studio lighting, a subtle contact shadow under the product and a slight reflection. Keep the product's shape, colour, label and text exactly as in the original. Square output, product centred with even margins.
Use this when: Marketplace listings that require a white background.
Place the product from the attached photo on a light marble kitchen counter with soft morning window light and a few blurred props in the background. Keep the product, its label and its proportions exactly unchanged and add a realistic shadow. 4:5 portrait.
Use this when: Social ads where a plain packshot feels sterile.
Correct the attached product photo: neutralise the yellow colour cast, brighten evenly, remove harsh reflections and recover detail in the darkest areas. Keep the product colour accurate to the original and change nothing about its shape or label.
Use this when: The product photo was shot at home under room light.
Show the product from the attached photo floating slightly above a soft neutral surface with a realistic soft shadow beneath it and studio lighting from above. Keep the product identical. Square output with generous empty space around it.
Use this when: Hero images and banner creatives.
Using the attached product photo as reference, produce the same product photographed from a slight three-quarter angle, same lighting, same white background, same scale. Keep the product design, colours and label identical to the reference.
Use this when: Listing galleries that need more than one angle.
Edit the attached clothing photo into a clean catalogue shot: flat plain light-grey background, even lighting, wrinkles softened but fabric texture and stitching preserved, garment colour true to the original. 4:5 portrait.
Use this when: Apparel listings shot at home.
Enhance the attached food photo: warmer natural lighting, richer but realistic colours, sharper texture on the dish and a softly blurred background. Do not add, remove or rearrange any food items. 1:1 square.
Use this when: Restaurant menus, Swiggy/Zomato listings and food ads.
Place the product from the attached photo in a hand of realistic proportion against a plain background, so the viewer can judge its size. Keep the product's dimensions relative to the hand accurate and the product itself unchanged. Square output.
Use this when: Buyers keep asking how big the product is.
Restoration & enhancement
Old, damaged or low-quality photos. Set expectations: AI reconstructs detail, it does not recover it.
Restore the attached old photograph: remove scratches, creases, dust and stains, repair torn edges and rebuild missing areas plausibly. Keep every face, feature and clothing detail faithful to the original — do not modernise or beautify anyone. Same framing.
Use this when: Scanned family photographs.
Colourise the attached black-and-white photograph with natural, period-appropriate colours: realistic skin tones, muted clothing colours and neutral backgrounds. Keep all details, faces and composition exactly as they are. Do not sharpen aggressively.
Use this when: Old family or archive photographs.
Reduce motion blur in the attached photo and recover edge detail on the subject's face and clothing, keeping a natural photographic look with no halos or over-sharpening artefacts. Keep composition and colours unchanged.
Use this when: A one-off shot you cannot retake.
Reduce the grain and colour noise in the attached low-light photo while keeping real texture in skin, fabric and background. Lift the shadows slightly, keep highlights from clipping and keep the mood of the original scene.
Use this when: Event photos shot in a dark hall.
Straighten the horizon in the attached photo, correct the lens distortion on the vertical lines and re-crop to 16:9 keeping the main subject on the left third. Do not change the subject or the colours.
Use this when: Architecture, interior and event photos.
Remove the [object] from the attached photo and rebuild the area behind it so the result looks natural, matching the surrounding texture, lighting and perspective. Change nothing else in the image.
Use this when: A wire, bin, sign or stray hand ruins an otherwise good photo.
Remove the watermark from the bottom-right corner of the attached photo, which is my own image, and reconstruct the area behind it to match the surrounding detail. Change nothing else.
Use this when: You own the image and need a clean copy. Do not do this to images you do not own.
Creative styles & transformations
Bigger stylistic changes for thumbnails, posts and illustrations.
Restyle the attached photo as a cinematic film still: teal-and-orange colour grade, anamorphic-style shallow depth of field, subtle grain and letterbox framing. Keep the subject, pose and setting recognisable. 16:9 landscape.
Use this when: YouTube thumbnails and hero banners.
Convert the attached photo into a loose watercolour illustration with visible paper texture, soft colour bleeds and confident line work at the edges. Keep the subject clearly recognisable and the composition unchanged.
Use this when: Gifts, greeting cards and softer brand visuals.
Convert the attached photo into a flat vector illustration with simplified shapes, a limited palette of four colours, no gradients and clean outlines. Keep the pose and layout recognisable. Square output on a plain background.
Use this when: Website graphics and slide decks that need a consistent style.
Convert the attached photo into a clean black-and-white line-art sketch on white, with confident single-weight outlines and minimal shading. Keep the subject recognisable and the proportions accurate.
Use this when: Colouring pages, icons and simple prints.
Restyle the attached photo as a comic-book panel: bold ink outlines, halftone dot shading, saturated flat colours and dramatic lighting. Leave a clear empty area at the top for a caption box, but add no text. 4:5 portrait.
Use this when: Story-format social posts.
Create a double-exposure effect from the attached portrait, blending a city skyline into the silhouette of the subject. Keep the face outline readable, use a two-tone palette and a plain light background. 4:5 portrait.
Use this when: Cover images and speaker graphics.
Reinterpret the scene in the attached photo as a clean isometric 3D render with soft ambient lighting, pastel colours and simplified geometry on a plain background. Keep the main objects and their arrangement recognisable. Square output.
Use this when: Explainer graphics for a landing page or deck.
Restyle the attached outdoor photo as the same scene in monsoon weather: wet surfaces, reflections on the ground, overcast light and a cooler colour grade. Keep the buildings, subject and composition unchanged.
Use this when: Reusing one location photo across seasonal campaigns.
Text, posters & thumbnails
AI still struggles with small text. Ask for space, then set the type yourself in a design tool.
Turn the attached photo into a poster background: subject on the right third, a clean darkened gradient area on the left third for headline text, and enough contrast for white type. Add no text at all. 4:5 portrait.
Use this when: You will add copy yourself in Canva or Figma.
Turn the attached photo into a YouTube thumbnail base: subject cut out and enlarged on the right, high-contrast colour grade, bold simple background on the left with empty space for a three-word headline. Add no text. 16:9 landscape.
Use this when: Building a thumbnail template you can reuse.
Create a wide banner version of the attached image, 16:9, with the subject positioned on the right and the left 40 per cent kept visually simple for text. Keep the subject unchanged and add no text or logos.
Use this when: Website heroes and LinkedIn banners.
Add the exact words "Free Live Masterclass" as a single line of bold sans-serif white text in the lower-left of the attached image, with a subtle dark gradient behind it for legibility. Use exactly those words, no other text, correct spelling.
Use this when: You need a quick post and the headline is very short.
Reframe the attached photo to a 1:1 square keeping the subject fully visible and centred, extending the background naturally where needed instead of cropping the subject. Do not change the subject.
Use this when: Converting landscape photos into carousel slides.
Extend the attached image to a 9:16 vertical frame by generating more background above and below that matches the existing scene, lighting and perspective. Keep the original subject untouched and in the middle third.
Use this when: Reusing a feed image for Stories and Reels without letterboxing.
Ad creatives for marketers
How performance marketers actually use these prompts — one variable per variation, so testing means something.
Using the attached product photo, produce the same shot on a plain white background. Keep the product, angle, lighting and framing identical. This is variant A of a creative test — change nothing except the background.
Use this when: You want a clean A/B test where only one variable moves.
Restyle the attached product photo to look like an authentic user photo taken on a phone: slightly imperfect framing, natural indoor daylight, a real home setting in the background. Keep the product and its label exactly accurate. 4:5 portrait.
Use this when: Polished studio creative is fatiguing on Meta.
Create a side-by-side comparison from the attached two images: the first on the left, the second on the right, separated by a thin white divider, matched brightness and identical framing. Add no text or labels. 1:1 square.
Use this when: Service businesses proving a visible result.
Restyle the attached product photo for a festive sale creative: warm festive lighting, subtle decorative elements at the edges, clear empty space in the upper third for an offer headline. Keep the product exactly unchanged and add no text.
Use this when: Sale campaigns reusing existing product photography.
Reframe the attached creative to 9:16 vertical for Stories, keeping the subject in the middle third and extending the background naturally at the top and bottom. Do not crop the subject and do not add text.
Use this when: One creative has to run across feed, Stories and Reels.
Turn the attached photo into a high-contrast opening frame for a short video ad: subject enlarged, bold simple background, strong colour separation, empty upper third for a hook line. Add no text. 9:16 vertical.
Use this when: Building the first frame of a Reels or Shorts ad.
Place the product from the attached photo into an Indian urban home setting with natural daylight and realistic props, background softly blurred. Keep the product, label and proportions exactly unchanged. 4:5 portrait.
Use this when: Global creative does not resonate with a local audience.
Worked example: phone photo to ecommerce packshot
The most common commercial use of these prompts is turning a photo shot at home into something you can list or advertise with.
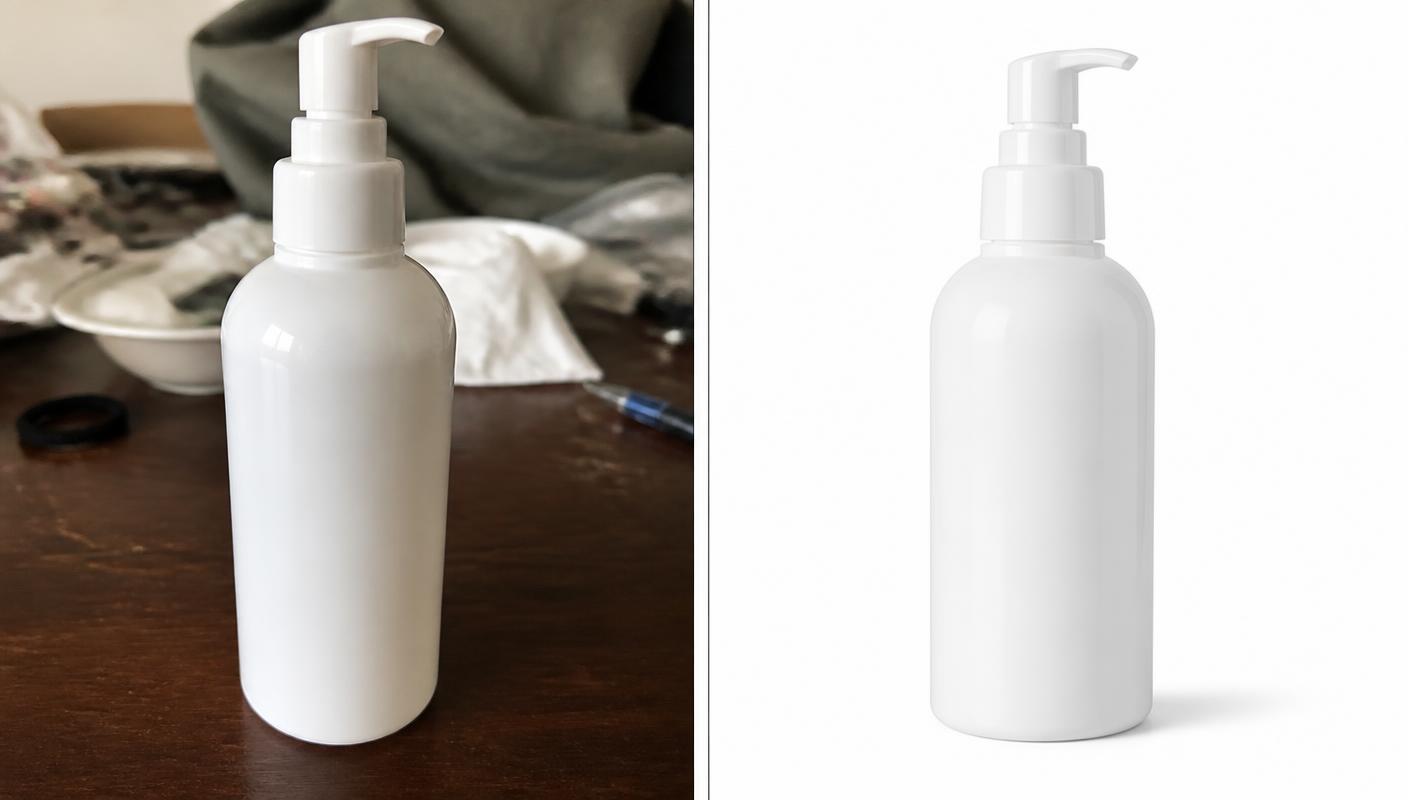
Prompt used: "Turn the attached product photo into a clean ecommerce packshot: pure white background, even soft studio lighting, a subtle contact shadow under the product and a slight reflection. Keep the product's shape, colour, label and text exactly as in the original. Square output, product centred with even margins."
Follow-up 1: "Same image, make the shadow softer and slightly shorter."
Follow-up 2: "Same image, 4:5 portrait with more empty space above the product."
Three prompts, three usable assets, no studio. The critical clause is keep the label exactly as in the original — a listing image with an AI-invented label is a returns problem waiting to happen.
Follow-up prompts that fix a bad output
Do not start over. Correct it:
- "Same image, only change the background — keep everything else pixel-for-pixel."
- "The face changed. Restore the original face exactly and keep only the new background."
- "Too saturated. Same image with natural, true-to-life colours."
- "The shadow direction does not match the light. Fix the shadow to match the key light from the left."
- "Keep this exact result but output it at 9:16 by extending the background, not cropping."
- "Edges around the hair look cut out. Redo the cut-out with soft, natural hair edges."
When a result is nearly right, say "keep this exact result" before your next instruction. It tells the model to treat its own output as the new reference.
Seven mistakes that ruin AI photo edits
- Asking for five changes in one prompt. One edit per prompt, then iterate.
- No preservation clause. If you did not protect it, the model can change it.
- No aspect ratio. You get a square, then you crop away your subject.
- Uploading a compressed screenshot. Garbage in, plausible-looking garbage out.
- Adjective soup. "Stunning, ultra HD, 8K, masterpiece" adds nothing. Concrete nouns and lighting terms do.
- Trusting text and labels. Always read them back.
- Not saving the prompt that worked. The prompt is the reusable asset, not the image.
ChatGPT vs other photo editing tools
| Tool | Best at | Weakness | Good for |
|---|---|---|---|
| ChatGPT | Describing an outcome in plain English; quick variations | Exact likeness, small text, precise colour | Backgrounds, restyles, quick ad variants |
| Google Gemini image editing | Fast conversational edits and strong subject consistency | Same text and detail limits | Iterating on the same subject repeatedly |
| Canva AI | Editing inside a layout with real typography | Less control over photographic realism | Posters, thumbnails, social templates |
| Photoshop (Generative Fill) | Pixel-level control, non-destructive, colour accuracy | Slower, needs skill | Final commercial retouching |
The practical workflow for most marketers: generate and vary in AI, finish anything precise in a design tool.
How performance marketers use photo editing prompts
This is where prompts stop being a party trick.
- Creative volume. One product shoot becomes twenty ad variants — different backgrounds, settings and moods — without booking a studio again.
- Disciplined testing. Change one visual variable per variant. When a variant wins on CTR or CPA, you know which element caused it. That is the same logic behind structured creative testing in Meta Ads.
- Placement coverage. Extend one asset to 1:1, 4:5, 9:16 and 16:9 instead of letterboxing and losing attention in Stories.
- Landing page consistency. Matching the ad image to the landing page hero keeps message match intact, which is one of the cheapest conversion wins available.
- Speed. A creative refresh that used to take a week takes an afternoon.
If you are learning paid media, this sits alongside the fundamentals covered in what performance marketing is and the shift already underway in ChatGPT Ads.
Test yourself
No signup, instant score. Answer all 5 and check where you stand.
Your prompting checklist
Tick these off before you publish any AI-edited image. It saves the "why does his hand have six fingers" conversation.
Ticks are saved in this browser — come back and pick up where you left off.
Where to go next
Prompting is a skill with a short learning curve and a long payoff. Start with backgrounds and packshots — the highest-reliability edits — then move to restyles and ad variants once you trust your own quality checks.
Editing couple and family photos instead? The same formula applies with one extra part — see couple prompts for Gemini AI for 64 copy-paste versions.
If you want to use AI across the whole campaign rather than just the creative, the AI-Powered Performance Marketing Course covers prompt-driven workflows for keyword research, ad copy, audience analysis and reporting alongside Google Ads, Meta Ads, GA4 and GTM. The prompt libraries in the shop give you ready-made packs if you would rather start from tested prompts than a blank chat.
Glossary
- Prompt
- The written instruction you give an AI model. For photo editing it describes the subject, the change you want and the constraints on that change.
- Image-to-image editing
- Editing an existing uploaded image rather than generating a new one from scratch. The uploaded photo acts as the reference the model works from.
- Aspect ratio
- The width-to-height proportion of the output — 1:1 square, 4:5 portrait, 9:16 vertical, 16:9 landscape. Each ad placement expects a specific one.
- Likeness drift
- When an AI edit subtly changes a person's face so the result no longer looks like them. Prevented with an explicit preservation instruction.
- Packshot
- A clean product photo on a plain background, used in ecommerce listings and catalogue ads.
- Negative space
- Deliberately empty area in an image where headline text, a logo or a CTA can sit without covering the subject.
- Iterative prompting
- Refining an output through follow-up instructions in the same conversation instead of rewriting the whole prompt.
- Upscaling
- Increasing an image's resolution. AI upscaling reconstructs detail rather than recovering it, so it can invent texture that was never there.
Sources & Further Reading
Frequently Asked Questions
Can ChatGPT edit my photos?+
Yes. You can upload a photo and describe the change you want in plain English — replacing the background, fixing lighting, removing an object, restyling the image or restoring an old print. It works as image-to-image editing, so the model uses your photo as the reference rather than generating something unrelated.
What is the best prompt structure for photo editing?+
Subject, edit action, style and lighting, background, aspect ratio, and what to keep unchanged. For example: 'Edit the attached portrait: replace the background with a neutral grey studio backdrop, soft studio lighting, 4:5 portrait, keep the face and outfit exactly unchanged.' That structure removes almost every guess the model would otherwise make for you.
Why does ChatGPT change my face when editing a photo?+
Because image editing regenerates pixels rather than masking them. Add an explicit preservation clause — 'keep the face, hairline and expression exactly as in the original, change nothing else' — and make one edit per prompt. If it still drifts, reply in the same chat asking it to keep the original face and only change the specific element.
Are ChatGPT photo editing prompts free?+
Image editing is available on paid ChatGPT plans, and free plans typically get limited image usage that changes over time. The prompts themselves cost nothing — the same prompt structure also works in other image tools, so nothing here is locked to one product.
Can I use AI-edited photos for ads and ecommerce listings?+
Usually yes, but check the platform's rules and be careful with anything that could mislead a buyer. Never let AI redraw a product's label, colour or shape in a listing image, and avoid AI-altered images that imply a result a customer will not get. For people, get consent before editing someone else's photo.
How do I get the exact aspect ratio I need?+
State it in the prompt — 1:1 for feed, 4:5 for portrait feed, 9:16 for Stories and Reels, 16:9 for YouTube and banners. If you already have a square image, ask the model to extend the background to the new ratio instead of cropping, so the subject stays intact.
Why does the text in my AI-edited image look wrong?+
Rendering small, accurate text is still the weakest part of AI image editing. Keep the original label if the photo already has text you need, or ask for empty space and add the type yourself in Canva, Figma or Photoshop. Only ask the model for very short headlines, and always proofread the output.
What is the difference between ChatGPT and Photoshop for editing?+
ChatGPT is faster for describing an outcome — 'put this on a white background, 4:5' — with no tool knowledge required. Photoshop gives you pixel-level control, exact colour accuracy and non-destructive edits. In practice marketers use AI to produce variations quickly, then finish anything precise in a design tool.
How can I make the same edit across many photos?+
Save the winning prompt and reuse it verbatim, changing only the uploaded image and the subject line. Consistency comes from the constant parts of the prompt — the background, lighting, ratio and preservation clause — so keep those word-for-word.
Which prompts do marketers use most?+
Background replacement, packshot clean-up, placement resizes and UGC-style restyles. They cover the daily work of shipping ad creative: making one shoot stretch across placements and testing one visual variable at a time.
Join our live training program and become a performance marketing professional.
Instant-download resources from the PMAcademy shop that pair with this guide.
- AI Prompts100+ AI Photo Editing Prompts PackCopy-paste prompts for ChatGPT & Gemini photo edits₹299
- AI Prompts10,000+ AI Prompts Library for MarketersReady-to-use prompts for ads, content, SEO and research₹499
- Trackers & SheetsCreative Testing Matrix TemplateTest hooks and angles without burning budget₹199